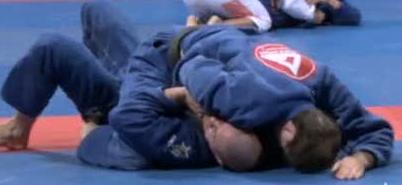
10/11/2011 – Teaching (Escaping Mount)
Posted: 10/11/2011 Filed under: teaching # Mount: Heel Drag Escape, Teaching BJJ, teaching mount, teaching mount escape 2 CommentsTeaching #027
Gracie Barra Bristol, (BJJ), Can Sönmez, Bristol, UK – 10/11/2011
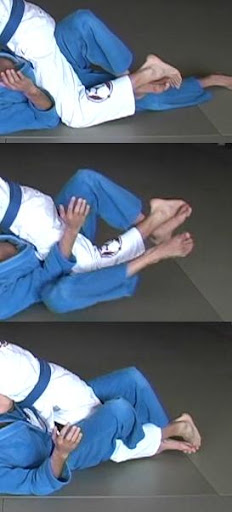
 This is right back into my comfort zone, as tonight, I’ll be showing my favourite escape from mount, the foot drag. It is also quite simple, which is another reason I like it. You’re in mount, your elbows in a good place for defence, down by their knees. For this escape to work, you need to have one of your legs out flat. You also need to get on your side (but watch out for technical mount): a slight bridging motion will help.
Next, wedge an elbow underneath their knee. You can either make a frame against their hips, or if you’re concerned about your neck, adjust so that you can still pry your elbow under their knee while protecting your collar with your hands. Use a combination of your elbow and shrimping to shove their knee backwards, on your flat leg side.
Bring your other foot over both your flat leg and the leg they have next to it. That means you can use the heel of that foot to drag their leg over your flat leg. As soon as you get it over, lock half guard and shrimp towards their trapped leg. In half guard, you want to get onto your side as quickly as possible: if you stay flat on your back, you’ve already done their work for them, as they will want to flatten you out in order to pass half guard. If you’re comfortable in half guard, you could stay there and work your attacks.
Alternatively, keep shrimping in the other direction, in order to free your other leg, just like you would with an elbow escape. It’s also worth noting that some people, like Roy Dean, recommend just pinching your knees rather than fully triangling your legs around theirs, so that’s worth trying too. To help recover full guard, you can also bring your arm across to their opposite shoulder, impeding their movement while aiding yours. Emily Kwok has a handy tip too: if their foot is tucked making it hard to drag, shove it out with your knee.
 A very similar escape, which I don’t use much, is the foot lift. Dean shows these two escapes in sequence on his awesome Blue Belt Requirements. The foot lift is for when they have some space underneath their in-step. People won’t often do that, in my experience, but if they do, this time just step over your flat leg. Use your foot to hook underneath their instep and lift it over, then as before lock up half guard (your legs are already in position), or shrimp to recover full guard.
Make sure that you pay particular attention to shoving on their knee with this variation, as it is easier for them to slip free (though if that happens, you can always switch to the foot drag). With both escapes, it is important to get the knee of their trapped leg back behind your legs. If they still have their knee past your legs, it makes it much easier for them to move straight into a half guard pass, by driving their knee to the mat and sliding through.
03/11/2011 – Teaching (Attacking Mount)
Posted: 03/11/2011 Filed under: Teaching BJJ, teaching mount, teaching mount attack 3 CommentsTeaching #026
Gracie Barra Bristol, (BJJ), Can Sönmez, Bristol, UK – 03/11/2011
 Last week, I talked about maintaining mount using the s-mount and the technical mount. Tonight I wanted to show a few basic attacks from those two positions, starting with s-mount. The common option there is to go for an armbar, which is what I most associate with s-mount.
To remind you how to get to s-mount, shift up into high mount, knees into their armpits. If they’re using a standard defence, with their arms crossed to protect their neck, your knees should have shoved their arms up. That leaves you space to slide a knee up to their head, turning to face their other arm, then curl the other leg around their armpit, so your foot is pointing to their head. Once you’re in s-mount, the arm is often right there for the taking, as you’ve squashed their arms up onto their chest in the process of getting there. Slide your arm past their bicep, then secure that in place by gripping your own gi.
Lean forward to increase the pressure on their chest, which also makes it easier to bring your leg over their head. Alternatively, you can post your free hand by the far side of their head, using that for base to swing your leg round instead. Either way, at this point, there are two schools of thought. The first is that you should bring your heels in close to either side of their shoulder, squeezing your knees. The second suggests crossing your feet instead. Some people argue that crossing your feet makes it easier for the person underneath to fling your legs off, as well as reducing your downwards pressure. Others feel that crossing your feet helps to lock the shoulder in place. Experiment with both. When you drop back for the armbar, make sure you’ve slid down their arm close to their shoulder and their thumb is pointing up.
 Before you can drop back for the armbar, they will probably lock their arms together to stop you. For the purposes of this technique, we’ll assume they’re grabbing the bicep of their free arm. There is a handy drill to work the grip break for this, which involves switching from side to side. Start by grabbing the outside of their far arm. Post your other arm behind you for base, or if you prefer, keep it hooked between their arms (which is perhaps better for control). Use that to switch to a crouch above them, then turn and adjust into s-mount on the other side.
If for some reason you can’t land the armbar, or you want to try a different attack, then Aesopian (still haven’t filled in his gi survey? Go here!) has a nifty method (he has more cool stuff from s-mount on there, if you’re interested in playing more with the position) of switching to a triangle instead. You want the armbar, but once again they’re using that bicep grab to block you. This time, you’ve going to shove the wrist of their free arm down, until you can bring your leg over the top. Push it through so that your calf goes to their neck. Lean forward and post your free arm on the far side of the mat, also using your near side leg for base. From there, you should now be able to triangle your legs, then bring your torso back to the centre for the mounted triangle (or roll to guard to finish it, if your prefer).
Another simple grip break I tend to use is to lean back towards their head, while you’re still holding their locked arms. Draw a semi-circle with your body from there, swinging towards their legs. Depending on how they’re gripping, that may pull the arm free: this one is probably best for when they’re just clasping their hands together. However, keep in mind that there are many different grips they can use (clasping hands, grabbing their bicep, gripping their sleeve, holding under your knee etc), which an equally large number of grip breaks. So, don’t rush when you’re in that armbar position: maintain control, take your time and work out how best to dislodge their arm.
 In technical mount, I like to go for a choke: there are several choke options from mount. For most of them, you need to get a hand under their top arm to grasp their nearest collar, then open it up. Your other hand curls around their neck, whereupon you can feed the collar for a tight grip.
For this particular choke, your first hand is now going to push through past the crook of their elbow, catching their arm in the process. Bring your hand behind their head, then pull your collar gripping hand back towards you, snaking around their neck. This should result in a tight choke: your first hand is mainly blocking their arm, rather than playing a major role in the choke.
Also note that it is tempting to try and use that grip on their arm to drop back for an armbar. It’s a possibility, but be careful, as it is all too easy to leave sufficient space that they follow you round, ending up in your guard instead of at the receiving end of a submission. If you do want the armbar, make sure you post an arm by their head to stop them turning. Gradually bring your leg over their head, then slide down their arm and fall back towards their legs.
27/10/2011 – Teaching (Maintaining Mount)
Posted: 27/10/2011 Filed under: Teaching BJJ, teaching mount, teaching mount maintenance 6 CommentsTeaching #025
Gracie Barra Bristol, (BJJ), Can Sönmez, Bristol, UK – 27/10/2011
Last time, I talked about the two main ways of maintaining the mount, which are low mount with grapevines, along with high mount, walking your knees up into their armpits, squeezing your legs into their sides. However, as with all the other dominant positions in BJJ, sometimes you’ll find your opponent is about to escape. Rather than lose the position, there are several transitions in mount that mean you can retain control.
 The most common is probably technical mount, sometimes referred to as seated mount. I mentioned this briefly in my previous lesson, but I wanted to spend more time on it tonight. If they turn under your mount, turn with them, so that you’re facing in the same direction as their head. They will end up facing away from you, balanced on their side. As you turn to follow them, lead that turning motion with your knee, sliding it along their back. The other knee comes off the floor, meaning that you can now jam the heel of that raised leg into their hip. This is key: if you leave any space, you’re vulnerable to their escape.
I tend to have the foot of the leg by their back tucked close to them, to cut off space. However, that may not provide as good a base compared to angling the foot away slightly, should they try to shove you in that direction. Lean into their shoulder with your upper body, to further help stabilise the position and remove any gaps. From there, I like to reach through with my lower hand and grab their collar, ready to initiate some choke attempts.
If you can get a decent grip on their upper body, then you can also apply some lessons we learned about other positions. For example, a while ago I showed one of Andre Galvao’s methods for keeping the back. If you look at that technique, you’ll see that certain stages are quite similar to the technical mount. So, if from reason the foot you have by their hip is slipping and they try to catch it in half guard, try sliding your other knee right to their head and rolling them to the other side. Due to their half guard attempt, they’ve already given you one hook, so you just need to insert the other.
It is also worth keeping in mind that you can of course switch back to full mount. That may present itself if they turn towards you from technical mount. By doing that, they’re basically putting themselves back underneath full mount: you just have to adjust your leg positioning slightly. Always try to stay fluid, rather than locking yourself stiffly into one position.
 A more secure way to go to the back from mount is to use a gift wrap, which you’ll also see called twisting arm control. If they have an elbow exposed (e.g., they might be reaching over to grab their own collar, in an attempt to protect their neck), you can push into that with your chest, to shove their hand down next to the side of their neck. If you then reach under their head with your arm and grasp their wrist, you can pull it tight.
Use that grip on their wrist to turn them on their side, switching your legs to the technical mount position. Drop backwards, pulling them along with you using that gift wrap grip. The first hook is simple, as you already had that foot by their hip, so it is in position. For the second hook, your knee that was by their back slides into position, as you are pulling them past it.
 Another option is to switch into s-mount, which is often the precursor to an armbar (which I’ll cover next week). From full mount, slide one knee up towards their head. Your other knee is going to drive into their far arm. Once you have their arm roughly at the level of their chest, swing the lower part of your far leg: your foot should point towards their head, with the rest of the leg curled around their armpit. It is important you keep this tight.
You should now be turned towards their far side, sitting back on your near side heel. To further tighten up the position, you can reaching under their head and grabbing your far ankle, pulling it towards their near side. Stephan Kesting recommends you slightly raise the knee that is by their head off the floor, to put additional pressure into their diaphragm. A final tip on s-mount, this time from Aesopian (fill out his gi survey if you haven’t already), is to hook their far leg with your free arm, to diminish the power of their bridge. He also tends to drive his near side knee a bit further, so that it slides under their head.
27/10/2011 – Teaching (Maintaining Mount: Technical Mount & Gift Wrap to the Back)
Posted: 27/10/2011 Filed under: Teaching BJJ, teaching mount, teaching mount maintenance 6 CommentsTeaching #025
Gracie Barra Bristol, (BJJ), Can Sönmez, Bristol, UK – 27/10/2011
Last time, I talked about the two main ways of maintaining the mount, which are low mount with grapevines, along with high mount, walking your knees up into their armpits, squeezing your legs into their sides. However, as with all the other dominant positions in BJJ, sometimes you’ll find your opponent is about to escape. Rather than lose the position, there are several transitions in mount that mean you can retain control.
The most common is probably technical mount, sometimes referred to as seated mount. I mentioned this briefly in my previous lesson, but I wanted to spend more time on it tonight. If they turn under your mount, turn with them, so that you’re facing in the same direction as their head. They will end up facing away from you, balanced on their side. As you turn to follow them, lead that turning motion with your knee, sliding it along their back. The other knee comes off the floor, meaning that you can now jam the heel of that raised leg into their hip. This is key: if you leave any space, you’re vulnerable to their escape.
I tend to have the foot of the leg by their back tucked close to them, to cut off space. However, that may not provide as good a base compared to angling the foot away slightly, should they try to shove you in that direction. Lean into their shoulder with your upper body, to further help stabilise the position and remove any gaps. From there, I like to reach through with my lower hand and grab their collar, ready to initiate some choke attempts.
If you can get a decent grip on their upper body, then you can also apply some lessons we learned about other positions. For example, a while ago I showed one of Andre Galvao’s methods for keeping the back. If you look at that technique, you’ll see that certain stages are quite similar to the technical mount. So, if from reason the foot you have by their hip is slipping and they try to catch it in half guard, try sliding your other knee right to their head and rolling them to the other side. Due to their half guard attempt, they’ve already given you one hook, so you just need to insert the other.
It is also worth keeping in mind that you can of course switch back to full mount. That may present itself if they turn towards you from technical mount. By doing that, they’re basically putting themselves back underneath full mount: you just have to adjust your leg positioning slightly. Always try to stay fluid, rather than locking yourself stiffly into one position.
 A more secure way to go to the back from mount is to use a gift wrap, which you’ll also see called twisting arm control. If they have an elbow exposed (e.g., they might be reaching over to grab their own collar, in an attempt to protect their neck), you can push into that with your chest, to shove their hand down next to the side of their neck. If you then reach under their head with your arm and grasp their wrist, you can pull it tight.
Use that grip on their wrist to turn them on their side, switching your legs to the technical mount position. Drop backwards, pulling them along with you using that gift wrap grip. The first hook is simple, as you already had that foot by their hip, so it is in position. For the second hook, your knee that was by their back slides into position, as you are pulling them past it.
 Another option is to switch into s-mount, which is often the precursor to an armbar (which I’ll cover next week). From full mount, slide one knee up towards their head. Your other knee is going to drive into their far arm. Once you have their arm roughly at the level of their chest, swing the lower part of your far leg: your foot should point towards their head, with the rest of the leg curled around their armpit. It is important you keep this tight.
You should now be turned towards their far side, sitting back on your near side heel. To further tighten up the position, you can reaching under their head and grabbing your far ankle, pulling it towards their near side. Stephan Kesting recommends you slightly raise the knee that is by their head off the floor, to put additional pressure into their diaphragm. A final tip on s-mount, this time from Aesopian (fill out his gi survey if you haven’t already), is to hook their far leg with your free arm, to diminish the power of their bridge. He also tends to drive his near side knee a bit further, so that it slides under their head.
16/06/2011 – Teaching (Escaping Mount)
Posted: 16/06/2011 Filed under: Teaching BJJ, teaching mount, teaching mount escape Leave a commentTeaching #007
Gracie Barra Bristol, (BJJ), Can Sönmez, Bristol, UK – 16/06/2011
I’m finishing up my series on the mount with escapes. For this lesson, I wanted to cover the two simplest methods of escaping the mount: I’ll look into incorporating other options further down the line. There were a few drills I wanted to add, beginning with shrimping in pairs again (one person standing by the others armpits, bottom person shrimps back to guard). I also had them do bridges from side to side, then with a big step.
 The first basic escape is the trap and roll. A typical starting point would be when they try to establish their first grip on your collar for a choke. That provides you with a chance to trap their arm. The usual grip would be to grab their wrist with your opposite hand, then their elbow with your other hand. There are various other possibilities, like wrapping the arm, but the essential thing is to stop their ability to post their hand for base.
You could also bring your linked arms over one of theirs, to bend their elbow and trap the arm. That’s especially useful when you intentionally set up this escape, bumping them forward to get them to post their hands on the floor. You also need to trap their leg on that same side. Otherwise, they will be able to use that for base as you attempt to roll them. In order to prevent that, step your same side foot over their lower leg, hooking it in tightly. This means they are now like a chair with two of its legs missing.
To finish, you’re going to bridge towards that trapped side. As with the side control escape, get your heels close to your bum first for maximum leverage. Bridge up and over your shoulder, turning into their guard. Make sure that you’re bridging over your shoulder and turning to your knees, not simply rolling over to your side. If you don’t raise your hips properly, you may merely give up your back.
 I felt like it didn’t take long to go through the basics of the trap and roll: I could have fitted in more details. I ended up teaching some additional points before progressive resistance, but instead should have done it all in one chunk. The addition was how you could still trap and and roll if they brought an arm under your head: simply reach back as if you were combing your hair to trap their arm, then progress as before. I also went through how to remove grapevines, by brining one of your feet back to your bum, then pushing off the hook on that leg with your other foot.
The trap and roll escape does work, but on its own may not be enough against an experienced opponent. Personally, I prefer the elbow escape, which relies more on shrimping than bridging. As a rule of thumb, if you’re underneath, you don’t want to be flat on your back. So, start your elbow escape by turning to your side and working your elbows inside their knee. Keep defending your neck throughout, so that your elbows form a frame. Create some space by bridging. You can then use your frame to help you shrimp into the space you just created, pushing against their leg.
The idea is to make enough space to pull your leg through: don’t just bridge and plop back down. That leg will need to be flat, the other raised, or it will be hard to pull it free. Once it’s out, you can then use that leg to wrap around one of theirs. Getting to half guard may be a possibility here, but generally I’d recommend working towards full guard. To do that, keep shrimping and framing until both legs are free.
You can also use a frame against their hips, one arm across, the other bracing against that wrist, elbow in tight. That’s also handy for stopping them moving up higher in mount. However, be extra careful with your neck if you do that: as your arms are down by their hips, that could leave you vulnerable to chokes. I’m not sure I was clear enough with my explanation here, so that’s something I want to improve next time.
As with any technique, try to combine your escapes rather than obsessing over just one. Also, don’t give them your head: that’s what the person on top wants for control. Connected to that, make sure you always defend your neck and keep your elbows tight. This is something I mentioned to Ryan afterwards, as he was asking what to do with bigger guys. I’m a small guy, so this is what I tend to do most classes: stay really tight, elbows in, knees curled up, not leaving anything loose for them to attack, or space for them to wedge their hands through.
Finally, I was reminded of a safety point regarding grips, as one of the white belts tweaked their finger. You should never grip inside the sleeve or trouser cuff: not only is that IBJJF competition illegal, it is also dangerous. If they suddenly twist or wrench, you’re going to hurt your fingers. A better option is to use your thumb to make a ‘pocket’ for your four fingers, gripping the outside of the cuff, or a pistol grip (where you grasp the gi material in your fist).
16/06/2011 – Teaching (Escaping Mount)
Posted: 16/06/2011 Filed under: teaching # Mount: Basic Escapes, Teaching BJJ, teaching mount, teaching mount escape Leave a commentTeaching #007
Gracie Barra Bristol, (BJJ), Can Sönmez, Bristol, UK – 16/06/2011
I’m finishing up my series on the mount with escapes. For this lesson, I wanted to cover the two simplest methods of escaping the mount: I’ll look into incorporating other options further down the line. There were a few drills I wanted to add, beginning with shrimping in pairs again (one person standing by the others armpits, bottom person shrimps back to guard). I also had them do bridges from side to side, then with a big step.
 The first basic escape is the trap and roll. A typical starting point would be when they try to establish their first grip on your collar for a choke. That provides you with a chance to trap their arm. The usual grip would be to grab their wrist with your opposite hand, then their elbow with your other hand. There are various other possibilities, like wrapping the arm, but the essential thing is to stop their ability to post their hand for base.
You could also bring your linked arms over one of theirs, to bend their elbow and trap the arm. That’s especially useful when you intentionally set up this escape, bumping them forward to get them to post their hands on the floor. You also need to trap their leg on that same side. Otherwise, they will be able to use that for base as you attempt to roll them. In order to prevent that, step your same side foot over their lower leg, hooking it in tightly. This means they are now like a chair with two of its legs missing.
To finish, you’re going to bridge towards that trapped side. As with the side control escape, get your heels close to your bum first for maximum leverage. Bridge up and over your shoulder, turning into their guard. Make sure that you’re bridging over your shoulder and turning to your knees, not simply rolling over to your side. If you don’t raise your hips properly, you may merely give up your back.
 I felt like it didn’t take long to go through the basics of the trap and roll: I could have fitted in more details. I ended up teaching some additional points before progressive resistance, but instead should have done it all in one chunk. The addition was how you could still trap and and roll if they brought an arm under your head: simply reach back as if you were combing your hair to trap their arm, then progress as before. I also went through how to remove grapevines, by brining one of your feet back to your bum, then pushing off the hook on that leg with your other foot.
The trap and roll escape does work, but on its own may not be enough against an experienced opponent. Personally, I prefer the elbow escape, which relies more on shrimping than bridging. As a rule of thumb, if you’re underneath, you don’t want to be flat on your back. So, start your elbow escape by turning to your side and working your elbows inside their knee. Keep defending your neck throughout, so that your elbows form a frame. Create some space by bridging. You can then use your frame to help you shrimp into the space you just created, pushing against their leg.
The idea is to make enough space to pull your leg through: don’t just bridge and plop back down. That leg will need to be flat, the other raised, or it will be hard to pull it free. Once it’s out, you can then use that leg to wrap around one of theirs. Getting to half guard may be a possibility here, but generally I’d recommend working towards full guard. To do that, keep shrimping and framing until both legs are free.
You can also use a frame against their hips, one arm across, the other bracing against that wrist, elbow in tight. That’s also handy for stopping them moving up higher in mount. However, be extra careful with your neck if you do that: as your arms are down by their hips, that could leave you vulnerable to chokes. I’m not sure I was clear enough with my explanation here, so that’s something I want to improve next time.
As with any technique, try to combine your escapes rather than obsessing over just one. Also, don’t give them your head: that’s what the person on top wants for control. Connected to that, make sure you always defend your neck and keep your elbows tight. This is something I mentioned to Ryan afterwards, as he was asking what to do with bigger guys. I’m a small guy, so this is what I tend to do most classes: stay really tight, elbows in, knees curled up, not leaving anything loose for them to attack, or space for them to wedge their hands through.
Finally, I was reminded of a safety point regarding grips, as one of the white belts tweaked their finger. You should never grip inside the sleeve or trouser cuff: not only is that IBJJF competition illegal, it is also dangerous. If they suddenly twist or wrench, you’re going to hurt your fingers. A better option is to use your thumb to make a ‘pocket’ for your four fingers, gripping the outside of the cuff, or a pistol grip (where you grasp the gi material in your fist).
09/06/2011 – Teaching (Attacking Mount)
Posted: 09/06/2011 Filed under: Teaching BJJ, teaching mount, teaching mount attack 2 CommentsTeaching #005
Gracie Barra Bristol, (BJJ), Can Sönmez, Bristol, UK – 02/06/2011
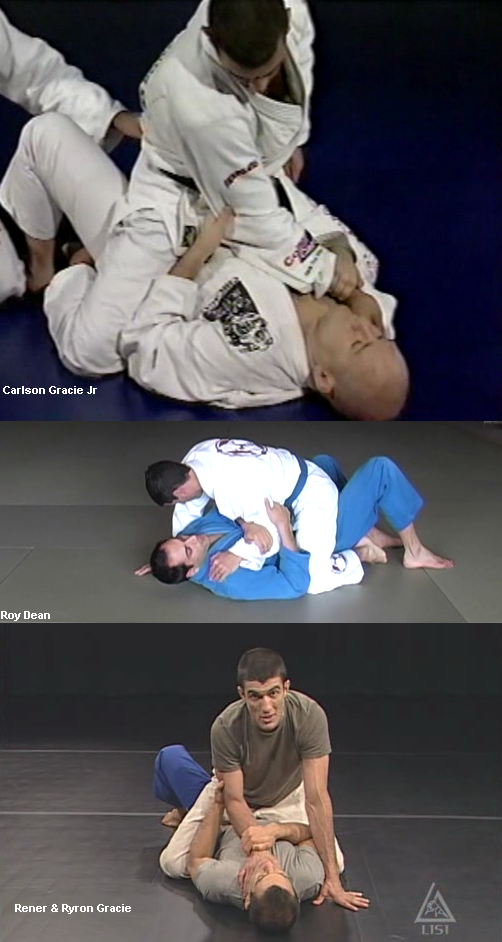
Now that we have an idea how to maintain mount, I wanted to show some attacks from there, in high and low mount respectively. The material I’m going to cover owes a lot to a training partner of mine at RGA Bucks, who was promoted to purple alongside me: Sahid Khamlichi. A little over a month ago, he taught a fantastic lesson on Roger Gracie’s version of the cross choke from mount. Many of the details I’m about to cover come from Sahid’s lesson, so the wording will be very similar to my earlier write up.
I have seen this choke taught a few times over the years, including by Roger himself, but it’s always useful to go over the details again. As has been said many times before, it may be the first submission you learn, but it’s one of the toughest to master.
I’ll put up the same bunch of pictures showing Roger choking out Lovato Jr in 2009, though like I noted last time, I’m going to cheat and put them out of order: Roger also didn’t set it up exactly the way I’m about to describe, but hopefully the photos will still help. You could also take a look at Trumpet Dan’s videos, and here’s Roger teaching a slightly different variation of the cross choke ( turn on the subtitles by clicking ‘CC’ at the bottom right).
 Start in that high mount I showed last week, keeping low, your arm based out, putting your head on the same side to concentrate your weight. Remember to keep your feet tucked under them bum for control.
Your other arm goes under their head, cross-facing, also using your shoulder to turn their head towards your basing side. It will now be tough to bridge you off. It is also important that you are really tight with your chest, so that there is no space for them to slip an arm inside to defend their neck.
 Grab their same side collar with your basing arm, or just the material by their shoulder. This isn’t going to be involved in the choke, as at this stage, you are simply looking to yank the gi material to your basing side. That should take out any slack. The grip comes next, as you pull your arm out from behind their head, instead reaching through (raising up as little as possible) for that collar you’ve carefully prepared. Grasp with your four fingers, palm facing up. Your free hand can continue to cinch up their collar if it still isn’t tight enough.
If they are blocking with their arms, as is likely, you’ll need to drive your hand past their hands. Pull open their collar before their elbows (rather than trying to yank it out from directly underneath their tightly crossed arms), then slide your arm through. Good advice I remember from Roger is that if you need extra leverage, brace your own elbow against your hip. You can then wriggle forwards, driving your arm in front of you. Also form your hand into a wedge, as this will help cut past their blocking arms.
 Either way, once you have the grip, lift them up towards you slightly, twisting your hand so that you clear a small gap between their neck and collar. Into that gap, insert the thumb of your free hand, to establish your second grip. I forgot to mention here that you can drop your elbow to the other side, so that you’re pressuring into their neck.
 Slide that thumb behind their head to the other side of their neck. As you do, also move your head to the other side of their head. Next, bring the arm of your thumb grip to the other side of their head, ‘shaving’ close to their face. This is to set up the choke, putting your wrists on both sides of their neck.
 Once you’ve got the thumb arm into position, so that both carotid arteries are blocked off, move your forehead to the floor directly above their head. Twist your wrists and drop your weight into them to finish the choke. Roy Dean provides a handy tip here, which is to shift your hips forward slightly, still basing on your head. That will give you a little extra leverage, should you need it.
From low mount, I mentioned last week that this position isn’t well suited to submissions, but there is at least one reliable option. For the Ezequiel choke, you again need to get one arm under their head. Many people will just give you that space as they try to escape, but if not, you can press into their neck to get them to raise their head.
You have one arm in place. To get the choke, you need to block off both sides of their neck. For the first side, you’re going to use your gi. With the hand you have under their head, grab your free sleeve. Pull it tight to the nearest side of their neck.
To block the other side of their neck, make a chopping motion with your free hand, as if you’re trying to decapitate them. Make sure you’re pressing into the side of their neck, not the throat (although crushing the windpipe may still get a tap, it isn’t as efficient).
Obviously it isn’t going to be that easy in sparring. They’re going to be blocking you with their hand, trying to buck you off, disrupting your attack any way they can. To avoid that, there are a couple of options. One is to slip your arm inside their defending arm until your elbow gets to the mat. Alternatively, they may give you the opportunity by pushing on your knee.
Either way, slide their arm out of the way and clamp it to their side with your elbow. Fill up the space by sticking your head right next to theirs. Use this as both a means of control and a barrier against their efforts to get a hand back inside. Stay low, then gradually slip in your second hand.
Again, they may give you the opportunity by bridging. If they are staying really tight, use your head to push into their skull, aiming to get them to turn. Follow your head with your hand, then slip through for the choke.
You can also try bringing a leg to their shoulder for leverage, chopping into their neck with your hand as before, raising up to generate even more pressure. However, that does give them more space for defence.
Finally, I showed a nastier variation, which I was in two minds about demonstrating. It is a bit unpleasant after all, and that isn’t the kind of jiu jitsu I generally want to be teaching. Then again, it combines fairly well with the Ezequiel, so can be used as a way of opening them up to other attacks, rather than a finish in itself.
 I’m referring to what Roy Dean calls the ‘fist choke’. The set-up is similar to the Ezequiel, as again it involves having an arm under their head and grabbing the sleeve of your free arm. This time, you don’t pull that sleeve in tight to their neck. Instead, you simply drive your fist into their neck instead. That closes off one side.
To block the other artery, cross-face them. The bicep of the arm you have under their head should be as close to their neck as possible, after which you can just roll your shoulder to apply pressure. Pull on the gi sleeve, and that combination should result in either the tap, or loosen them up for an Ezequiel, an armbar or some other attack.
I did emphasise that this isn’t something you should regularly be attempting during training, as it is probably going to annoy your training partners. Best to stick with smooth technique if possible, and save more crude applications like the fist choke for competition. I’d be interested to know what anyone reading this thinks: is the fist choke a ‘dirty’ technique, or something legitimate you regularly use in class?
A few people had problems getting the Ezequiel right, as their sleeves were a little short. The fist choke still works in that situation, but it did make me wonder if I could make some adjustment of angle or pressure that would mean a shorter sleeve wouldn’t be a problem.
09/06/2011 – Teaching (Attacking Mount)
Posted: 09/06/2011 Filed under: Teaching BJJ, teaching mount, teaching mount attack 2 CommentsTeaching #005
Gracie Barra Bristol, (BJJ), Can Sönmez, Bristol, UK – 02/06/2011
Now that we have an idea how to maintain mount, I wanted to show some attacks from there, in high and low mount respectively. The material I’m going to cover owes a lot to a training partner of mine at RGA Bucks, who was promoted to purple alongside me: Sahid Khamlichi. A little over a month ago, he taught a fantastic lesson on Roger Gracie’s version of the cross choke from mount. Many of the details I’m about to cover come from Sahid’s lesson, so the wording will be very similar to my earlier write up.
I have seen this choke taught a few times over the years, including by Roger himself, but it’s always useful to go over the details again. As has been said many times before, it may be the first submission you learn, but it’s one of the toughest to master.
I’ll put up the same bunch of pictures showing Roger choking out Lovato Jr in 2009, though like I noted last time, I’m going to cheat and put them out of order: Roger also didn’t set it up exactly the way I’m about to describe, but hopefully the photos will still help. You could also take a look at Trumpet Dan’s videos, and here’s Roger teaching a slightly different variation of the cross choke ( turn on the subtitles by clicking ‘CC’ at the bottom right).
 Start in that high mount I showed last week, keeping low, your arm based out, putting your head on the same side to concentrate your weight. Remember to keep your feet tucked under them bum for control.
Your other arm goes under their head, cross-facing, also using your shoulder to turn their head towards your basing side. It will now be tough to bridge you off. It is also important that you are really tight with your chest, so that there is no space for them to slip an arm inside to defend their neck.
 Grab their same side collar with your basing arm, or just the material by their shoulder. This isn’t going to be involved in the choke, as at this stage, you are simply looking to yank the gi material to your basing side. That should take out any slack. The grip comes next, as you pull your arm out from behind their head, instead reaching through (raising up as little as possible) for that collar you’ve carefully prepared. Grasp with your four fingers, palm facing up. Your free hand can continue to cinch up their collar if it still isn’t tight enough.
If they are blocking with their arms, as is likely, you’ll need to drive your hand past their hands. Pull open their collar before their elbows (rather than trying to yank it out from directly underneath their tightly crossed arms), then slide your arm through. Good advice I remember from Roger is that if you need extra leverage, brace your own elbow against your hip. You can then wriggle forwards, driving your arm in front of you. Also form your hand into a wedge, as this will help cut past their blocking arms.
 Either way, once you have the grip, lift them up towards you slightly, twisting your hand so that you clear a small gap between their neck and collar. Into that gap, insert the thumb of your free hand, to establish your second grip. I forgot to mention here that you can drop your elbow to the other side, so that you’re pressuring into their neck.
 Slide that thumb behind their head to the other side of their neck. As you do, also move your head to the other side of their head. Next, bring the arm of your thumb grip to the other side of their head, ‘shaving’ close to their face. This is to set up the choke, putting your wrists on both sides of their neck.
 Once you’ve got the thumb arm into position, so that both carotid arteries are blocked off, move your forehead to the floor directly above their head. Twist your wrists and drop your weight into them to finish the choke. Roy Dean provides a handy tip here, which is to shift your hips forward slightly, still basing on your head. That will give you a little extra leverage, should you need it.
From low mount, I mentioned last week that this position isn’t well suited to submissions, but there is at least one reliable option. For the Ezequiel choke, you again need to get one arm under their head. Many people will just give you that space as they try to escape, but if not, you can press into their neck to get them to raise their head.
You have one arm in place. To get the choke, you need to block off both sides of their neck. For the first side, you’re going to use your gi. With the hand you have under their head, grab your free sleeve. Pull it tight to the nearest side of their neck.
To block the other side of their neck, make a chopping motion with your free hand, as if you’re trying to decapitate them. Make sure you’re pressing into the side of their neck, not the throat (although crushing the windpipe may still get a tap, it isn’t as efficient).
Obviously it isn’t going to be that easy in sparring. They’re going to be blocking you with their hand, trying to buck you off, disrupting your attack any way they can. To avoid that, there are a couple of options. One is to slip your arm inside their defending arm until your elbow gets to the mat. Alternatively, they may give you the opportunity by pushing on your knee.
Either way, slide their arm out of the way and clamp it to their side with your elbow. Fill up the space by sticking your head right next to theirs. Use this as both a means of control and a barrier against their efforts to get a hand back inside. Stay low, then gradually slip in your second hand.
Again, they may give you the opportunity by bridging. If they are staying really tight, use your head to push into their skull, aiming to get them to turn. Follow your head with your hand, then slip through for the choke.
You can also try bringing a leg to their shoulder for leverage, chopping into their neck with your hand as before, raising up to generate even more pressure. However, that does give them more space for defence.
Finally, I showed a nastier variation, which I was in two minds about demonstrating. It is a bit unpleasant after all, and that isn’t the kind of jiu jitsu I generally want to be teaching. Then again, it combines fairly well with the Ezequiel, so can be used as a way of opening them up to other attacks, rather than a finish in itself.
 I’m referring to what Roy Dean calls the ‘fist choke’. The set-up is similar to the Ezequiel, as again it involves having an arm under their head and grabbing the sleeve of your free arm. This time, you don’t pull that sleeve in tight to their neck. Instead, you simply drive your fist into their neck instead. That closes off one side.
To block the other artery, cross-face them. The bicep of the arm you have under their head should be as close to their neck as possible, after which you can just roll your shoulder to apply pressure. Pull on the gi sleeve, and that combination should result in either the tap, or loosen them up for an Ezequiel, an armbar or some other attack.
I did emphasise that this isn’t something you should regularly be attempting during training, as it is probably going to annoy your training partners. Best to stick with smooth technique if possible, and save more crude applications like the fist choke for competition. I’d be interested to know what anyone reading this thinks: is the fist choke a ‘dirty’ technique, or something legitimate you regularly use in class?
A few people had problems getting the Ezequiel right, as their sleeves were a little short. The fist choke still works in that situation, but it did make me wonder if I could make some adjustment of angle or pressure that would mean a shorter sleeve wouldn’t be a problem.
02/06/2011 – Teaching (Maintaining Mount)
Posted: 02/06/2011 Filed under: Teaching BJJ, teaching mount, teaching mount maintenance 2 CommentsTeaching #004
Gracie Barra Bristol, (BJJ), Can Sönmez, Bristol, UK – 02/06/2011
Having shown a transition to mount last week, tonight my intention was to help people maintain the position once they got there. There are two basic types of mount to choose from, which I’ll call low and high. In future lessons, I’ll be looking in more detail at various sub positions like technical mount and s-mount, but for now we’ll stick with basics. Once you’ve achieved mount, I find that low mount provides the most control. First off, you want to immobilise their hips, as their main method of making space is to bridge up forcefully.
Bring your feet right back, threading them around their legs to establish two hooks: this is known as a grapevine. Alternatively, you can also cross your feet underneath, which has the advantage of making it much harder for them to push your hooks off. Your knees are barely touching the ground, to generate maximum pressure.
 Also be sure to thrust your own hips down into them. Use your hands for base, where again you have a couple of options. Either have both arms out, or put one under the head while the other goes out wide for base. Keep your head on the basing arm side, loading up your weight there. If they’re bridging hard, you can switch from side to side.
As usual, I then had everyone drill this for four minutes each. Before moving on to the three minutes each of progressive resistance, there were a couple of points I wanted to make, having observed what people were doing. These were also points I was intending to make anyway: upon reflection, it would have been better to do them earlier during the main technique demonstration, as that felt a bit brief anyway.
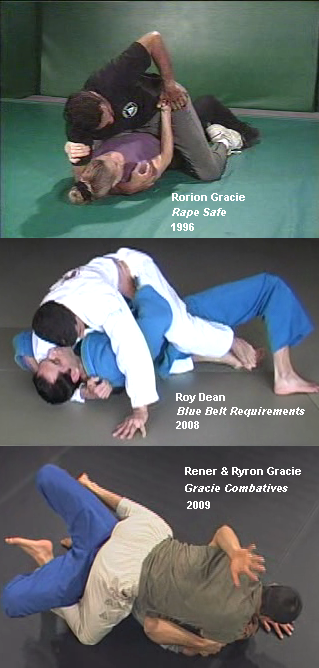
 First point was that a basic escape, which I’ll be showing in a couple of weeks, is to trap an arm, bridge and roll. So, don’t let them grab your arm and crush it to your side. Instead, swim it through, like Ryron and Rener demonstrate in the third slice of the third lesson in Gracie Combatives. Be sure to do it one at a time, or you may get both arms squashed to your sides.
Worth noting here that when I demonstrated this, I started with Clayton, then called up Miles to make sure Clayton could see it too. However, Miles’ method of trapping my arm was different to what I’m used to, which confused me for a moment. It felt a bit like the classic “you attacked me wrong!” moment from the old Jim Carrey In Living Colour sketch, but hopefully people still got the idea. Something for me to be aware of next time. 😉
Second point was that you can also turn to what’s called technical mount if they roll to either side. I didn’t go into much detail here, but I think next time, I’ll go through it in full, as I ended up doing that later anyway. It is possibly good to introduce the basic version then explain more fully later on (which I know is what some instructors like to do), but I felt like I could have saved some precious rolling time by just going through it the once.
The drawback to the low mount is that there aren’t many submissions from there: I’ll be showing the main option next week. They are mostly going to be trying to unhook your feet, so you’ll be battling to keep those in place.
 To attack, you’re better off climbing further up, into high mount. Again, you need to worry about their hips. To control them, put your feet by their bum, tucking your toes underneath: Roger Gracie points this out as of particular importance. In what you might call ‘middle’ mount where you’re still over their hips, Saulo suggests that you ‘ride’ their bridges, like you were on a horse. Lean back, then as they bridge, lift up: you’re aiming to move with their hips, rather than just leaving a big space. So, this takes a good understanding of timing.
He also recommends against leaning forward, as he feels that gives them more space and leverage to escape. Hence why he leans back instead. Experiment, seeing how holding the head works for you versus leaning back. I think Saulo’s method requires more experience, and personally I feel unstable there, but as ever, I want to offer students choice whenever possible.
 The danger of leaning back is when you’re facing somebody with flexibility and/or long limbs. They might be able reach their legs over to kick into your armpits, either sliding out through your legs or pushing your over. You must control their hips with your feet, to prevent them from bending their body. Swimming the arms through might help you out here, this time against their legs, depending on how they attack.
Miles (cool to have him there) raised a good question while I was demonstrating on him, which was what do you do if they get the feet into your armpits, then start slipping out through your legs and looking to take your back. This has happened to me in the past: I normally just grab on the back of their collar, stay really low, then attempt to gradually work my hips back to flatten them out. However, something I’ll ask Geeza next time I get a chance, to see what his thoughts are.
 Another option is to move off their hips, shifting into a higher mount. Gradually walk your knees into their armpits (pulling on the top of their head may help) being careful of the elbows. If they start to work an elbow into your thigh, twist to one side and raise that knee. Pull their arm up with whatever you can grab, then reinsert your knee.
You could also go to technical mount from here, as that’s a position in itself with submission opportunities (though I wasn’t covering that today). There is a good drill, turning to technical mount from side to side as they push, but I didn’t have time for that: however, something I’d like to incorporate into the warm up. Also, remember to use your arms for base against their bridge, posting out if you need to.
 A final thing I wanted to mention, from Demian Maia, is that you can also use the cross-face. If they turn on their side to get their elbow back in, you can use the cross face to bring their head out of alignment: moving them with their head is easier than trying to move their shoulders or arms or whatever. Also, the body follows the head, so they are going to have trouble bridging or turning if you’ve got a solid cross face.
I had a question from one of the blue belts just after drilling, regarding removing that arm when they push into your knee. If they’ve got a tight grip, then how do you get it off? I suggested that if they’ve locked out their arm, you could move your foot back slightly to create some leeway, in order to then yank up on the arm and re-establish mount, or you could try cross-facing. However, I felt like I could have given a more conclusive answer, so that’s something else I’ll ask Geeza when I get the chance.
Again I didn’t include as much sparring time as I wanted, with only about nine minutes or so of king of the hill, split into two groups by weight. So, I need to shave a bit of time from somewhere. Possibly the warm-up, or I could cut progressive resistance to two minutes each rather than three.
Classes have been getting bigger each week, which is nice: first class was barely a handful, this week it was around twelve students. That will also help when it comes to sparring, as I should eventually be able to institute my preferred 1-2-3 grouping, but we’ll see how things go. Could be that class size will fluctuate depending on what I’m teaching.

